A page header appears at the top of pages of a website. Therefore, it acts as a website heading but also contains branding logos, navigational menus, and contact information. Furthermore, it may be a small band at the top or the entire area above the fold. Traditional page headers look the same from page to page. As a result, they give users a way to navigate between pages of the website as well as back to the home page. Finally, page headers also act as branding and identify pages as part of a website.
Page headers are built as part of a website’s theme or using header/footer plugins. Therefore, the header appears on all pages of the website. Additionally, WordPress and plugins allow headers to be excluded from identified pages on the site. Let’s look at page headers, what they contain, and how they are created.
A Page Header Is Often the First Impression of a Website
After a web page loads, visitors often see the header first. Consequently, this visual impression is important in engaging visitors. It should provide information about the site and what it is about as quickly as possible. The header of this website contains the websitesinten,com logo. This logo communicates visually with words and a clock representation what the website is about. As a result, visitors can quickly tell the basic idea of the website.
This site, like many others, uses the band at the top as the header on all of its pages. In fact, headers have been traditionally presented as a narrow band this way. However, in modern design, many websites use a “header” as all of the home page, or at least everything above the fold. When a header is used this way, pages other than the home page typically use the band at the top. As a result, the header on other pages is usually a smaller or abbreviated version of the home page header. In addition, some website designers use different headers for different sections of a website.
Information Contained in Page Headers
There are several items that appear in a typical header. Not all of these appear in every header. Here are some things that may be included.
Logo, business name, or brand identifier
Social link icons
Headline or brand slogan
Navigational Menu
Call to action or offer
Search (for larger websites)
First, the logo or business identifier, along with a headline or slogan, tells the visitor what the site does in a concise way. Secondly, the menu along with search on bigger sites helps visitors navigate to major parts of the website. Thirdly, a call to action or offer provides a shortcut to a main focus of the website. Finally, social icons connect visitors to related social media.
Each of these elements helps the visitor quickly see what the website can do for them. In addition, visitors are able quickly to find things that they will need. However, all of these parts will not be included in every header.
Creating a Page Header on a Website with WordPress
WordPress controls the look of page headers through its themes. In addition, the theme settings on a page control whether a header appears on that page. Generally, this defaults to “on” which displays a header on the page unless it is turned to off. These settings are found by navigating to a page in the WordPress dashboard and clicking on it.
Customizing the theme controls the look of the header, or various installed plugins can create headers and footers.
First, let’s look at how a WordPress theme controls the content and look of the page header. The examples in this section are from the customize menu of the popular OceanWP theme that is used by this website. To find the customize menu, log on to WordPress and click visit site at the top left (fig. 1). For more information about customizing the theme, read my article, OceanWP Theme Customization. The header sub-menu is found in the main customizing menu as shown in Fig. 2. Clicking on Header opens the header sub-menu as shown in Fig. 3 below.
More sub-menus control various items that are part of the header. As a result, these menus control the look and placement of these items on the page header.
Fig. 1 Getting to the OceanWP Customization Menu
Fig. 2 The header sub-menu
Fig. 3 Header customization sub-menu
Fig. 4 Header menu, General selection
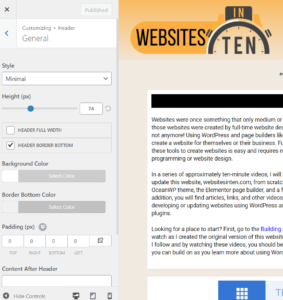
The General Selection of the Page Header Menu
Fig. 4 shows the top part of the general header menu when open. This menu sets the style of the header such as transparent, full page, center, etc. Additionally, the headers height is set. Thirdly, it sets the background color and the color of any border. Finally, it adds padding space around the inside edges of the content within the page header when needed.
The Header Media and Logo Menus
Fig. 5 Header Media Menu
The Header Media Menu, as shown in Fig. 5, allows video or images to be added to the header. In addition, it allows the header to use video linked from YouTube. Additional users, select and enable colors that overlay the video or image from this menu. Finally, the position, scrolling, and size of images can be chosen from the header media menu.
The Logo menu allows the designer to insert a logo or retina logo into the header. Furthermore, this menu allows the choice of logo color and color when a mouse is hovering over the logo.
Page Header Menu Sub-menu
Selecting menu opens the menu sub-menu. Fig. 6 and Fig. 8 show parts of this menu. As the name implies, this menu controls the look and placement of the navigational menu in the header.
In the top part of the menu, a template can be selected for the navigational menu. Secondly, the position of the menu is selected. Thirdly, a dropdown menu selects menu effects as shown in Fig. 7. Finally, further down in the menu, the header developer selects the colors for links and link background for both menu items and menu items when hovering. Additionally, this menu selects colors, backgrounds, borders, and size for dropdown menus.
Fig. 6 Top of the menu screen
Fig. 7 Menu effects
Fig. 8 Menu screen middle
Other Sub-menus of the Header Menu
Two other sub-menus fall under the header menu. First, the social menu creates links to social media in the header. Initially, checking the box enables this menu. Then, once enabled, the social menu can be styled and the hyperlink addresses for social links can be entered. Secondly, the mobile menu is set up through the mobile menu sub-menu. This is an extensive menu. First, it controls when the mobile menu is visible, where it is placed, what mobile icons will be used, what it will look like, and what will be in the menu. Fig. 9 shows part of the styling section of the mobile menu. Aa a result, the navigational menu is set up as it will appear on phones and tablets from this menu.
Fig. 9 The mobile menu
Building a Page Header with a Custom Page Builder Plugin
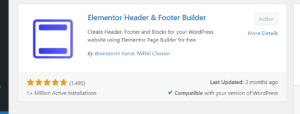
Using a plugin is another popular way to build page headers. My favorite plugin is the Elementor Header and Footer Builder plugin. First, it is compatible with the Elementor Page Builder plugin that I use to build all of my pages. Secondly, it allows me to use the drag and drop capabilities that I am already familiar with from Elementor. Finally, the plugin is free and available for installation from the WordPress dashboard. Therefore, simply select plugin, add new, and search for the plugin shown in Fig. 10. Subsequently, after selecting install now and activating the plugin, it appears on the dashboard appearance menu as shown is Fig. 11.
Fig. 10 Elementor Header & Footer Builder plugin
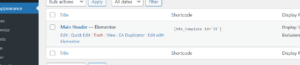
Fig. 12 Elementor Main Header
Fig. 11 Elementor Header & Footer Builder on the dashboard appearance menu
Selecting the page header builder from the menu creates headers that appear as in Fig. 12. First, notice that one of the options is edit with Elementor. This allows Elementor to create the header using Elementor’s drag and drop capabilities just like a page. As a result, Fig. 13 shows my page header as it is built with the Elementor Header & Footer Builder. Next, notice the grayed out section. This part appears on mobile devices in place of the part at the top. Therefore, Elementor allows headers to separate parts that will appear on different classes of devices.
Fig. 13 Building a page header with Elementor
Creating a Footer
While footers are not headers, they are important to websites. In addition, they are created in much the same way as headers. Consequently, WordPress Themes like OceanWP have settings for the footer as well as the header. However, Footers appear at the bottom of each page of a website in the same way page headers appear at the top.
The two menu items in the OceanWP customize menu, Footer Widgets and Footer Bottom control the look and placement of items in the footer. For example, enabling footer widgets in the Footer Widgets menu allows the user to choose the number of widget columns in the footer and to automatically add space to keep the footer at the bottom of the screen. Additionally, it sets the colors and look of the footer widget area. The Footer Bottom menu allows the enabling and visibility of the bottom of the footer. Secondly, it allows copyright inclusion. Finally it sets the colors and look of the bottom of the footer. Fig. 14 shows the Footer Widgets customizing menu while Fig. 15 shows it with footer widgets enabled.
Finally, plugins like Elementor Header & Footer Builder also create footers. Consequently, they have the advantage of using drag and drop technology and work like the page builder programs associated with them. Therefore, this makes them a good footer option for those using a page builder like Elementor to build pages for a website.
Fig. 14 Footer Widgets Menu
Fig. 15 Footer Widgets enabled
Start a WordPress Website. It's Easy and Straightforward.
WordPress makes creating headers and footer for pages easy. However, to install and customize a theme and have maximum control of the look of your website, you need a self-hosted WordPress website. As a result, you can use all the features of WordPress along with its themes and plugins. In addition, this process is easy, even if you have no experience creating a website.
First, get a domain name that represents your website. Registrars sell domain names to end users like you and me. In addition, many of these registrars provide web hosting as a kind of one-stop shopping for setting up a website and you will need a host. Secondly, get a host who provides space for storing the website content. Additional they provide the connection to the Internet. Finally, get a host that has WordPress installed and ready for installation on your website.
I support this website by affiliation with hosting companies. For example, one such company, Bluehost, pays me a commission (at no cost to you) if you click a link on this page and sign up for a domain and hosting by. Bluehost hosts this website. Further, it also acts as the domain registrar for websitesinten.com and other domain names that I own. In addition, Bluehost provides a free domain name for one year. Finally, this is the one I use, but there are hundreds of these registrar/hosts available on the Internet that provide comparable services.
Regardless of who you use for hosting, much of the process is the same. To see how I originally built this website, check out the videos in the Building a Website Series.
We use cookies on our website to give you the most relevant experience by remembering your preferences and repeat visits. For details on how we use cookies, please see our Privacy Policy. By clicking “Accept”, you consent to the use of ALL the cookies.
This website uses cookies to improve your experience while you navigate through the website. Out of these, the cookies that are categorized as necessary are stored on your browser as they are essential for the working of basic functionalities of the website. We also use third-party cookies that help us analyze and understand how you use this website. These cookies will be stored in your browser only with your consent. You also have the option to opt-out of these cookies. But opting out of some of these cookies may affect your browsing experience.
Necessary cookies are absolutely essential for the website to function properly. These cookies ensure basic functionalities and security features of the website, anonymously.
Cookie
Duration
Description
cookielawinfo-checbox-analytics
11 months
This cookie is set by GDPR Cookie Consent plugin. The cookie is used to store the user consent for the cookies in the category "Analytics".
cookielawinfo-checbox-functional
11 months
The cookie is set by GDPR cookie consent to record the user consent for the cookies in the category "Functional".
cookielawinfo-checbox-others
11 months
This cookie is set by GDPR Cookie Consent plugin. The cookie is used to store the user consent for the cookies in the category "Other.
cookielawinfo-checkbox-necessary
11 months
This cookie is set by GDPR Cookie Consent plugin. The cookies is used to store the user consent for the cookies in the category "Necessary".
cookielawinfo-checkbox-performance
11 months
This cookie is set by GDPR Cookie Consent plugin. The cookie is used to store the user consent for the cookies in the category "Performance".
viewed_cookie_policy
11 months
The cookie is set by the GDPR Cookie Consent plugin and is used to store whether or not user has consented to the use of cookies. It does not store any personal data.
Functional cookies help to perform certain functionalities like sharing the content of the website on social media platforms, collect feedbacks, and other third-party features.
Performance cookies are used to understand and analyze the key performance indexes of the website which helps in delivering a better user experience for the visitors.
Analytical cookies are used to understand how visitors interact with the website. These cookies help provide information on metrics the number of visitors, bounce rate, traffic source, etc.
Advertisement cookies are used to provide visitors with relevant ads and marketing campaigns. These cookies track visitors across websites and collect information to provide customized ads.