Customizing the OceanWP WordPress Theme
WordPress themes give a website its look and feel. However, websites often use the same theme, yet look and function very differently. It is the ability to customize the theme that facilitates this transformation. Some themes are more flexible than others. Consequently, many types of websites use these themes. OceanWP is one such theme. It is easy to customize with many user controlled features. As a result, many websites use this theme. This website uses OceanWP and it is the focus of the examples shown here.
The OceanWP Theme is Easy to Download and Install
OceanWP is available from WordPress.org and is downloaded and installed from the WordPress dashboard. First, click themes under the appearance menu item on the dashboard. Next click Add New Theme. Many popular themes appear. Thirdly, if OceanWP doesn’t appear near the top, search for it in the search themes box. Click the install button to install it. Finally, click activate to make it your current theme. OceanWP is installed and ready to customize! This works for any theme you choose. For example, Neve and Astra are a couple of other popular themes. Likewise, these themes customize in a similar way but the menus may look different. Additionally, menus may or may not contain the same features depending on how specialized the theme is.
Getting to the OceanWP Theme Customization Menu
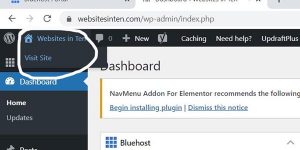
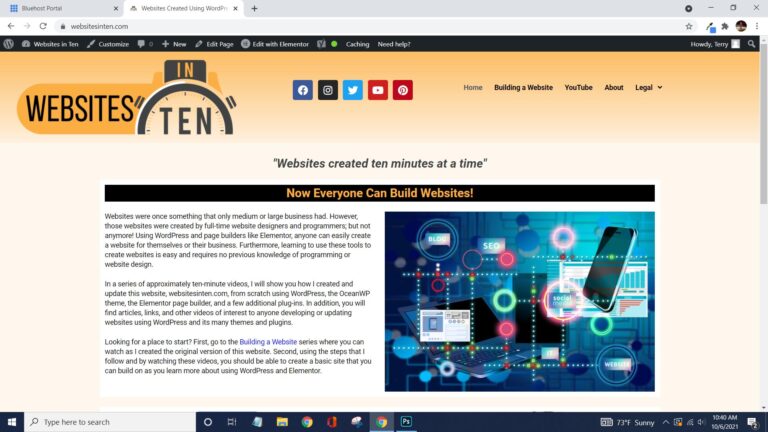
To get to the customize menu from the WordPress dashboard, first click the website name as shown in Fig. 1. The homepage for your website will appear. However, if you have not built a homepage, a sample page from OceanWP will appear. Next, under the address bar are menu items that include customize. Fig. 2 shows what that looks like on this website. Note the black menu bar below the browser address bar. Clicking Customize opens the customize menu.
The Main Customize Menu
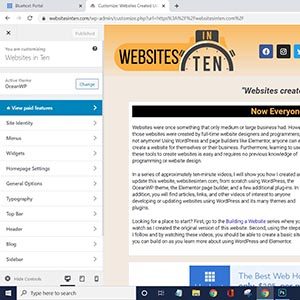
Fig. 3 shows the customize menu open. Therefore, this menu shows the customizable parts of the OceanWP theme. In addition, each of these menu items has a submenu. As a result, clicking on an item opens it for more detail. Furthermore, some of these items are more important to some users than others. However, it is the ability to change these items that gives OceanWP its flexibility. Notably, General Options and Typography are important in controlling the look and feel of the site. Therefore, these are a focus of the customizing process.
The Site Identity is how the page title and tagline is changed. In addition a logo can be added that will appear on the browser tab. The Menu selection allows the user to specify items for the menus and where menus appear. However, if you use a page builder or menu plugins these may not be needed.
Widgets and the Homepage Settings
A widget is a block of code or an app on a website designed to do one thing. The Widgets selection on the customize menu allows users to customize what widgets appear on a page and where they are positioned. However, this item may not be needed with page builders or if widgets are not used.
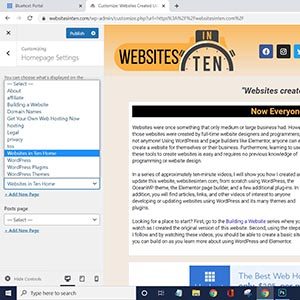
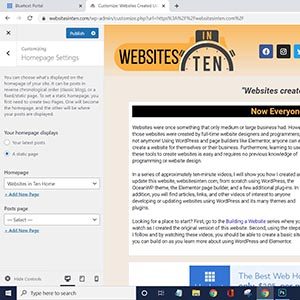
The Homepage Settings selection is important. It sets the page on the website that will act as the homepage (Fig. 4). As a result, this becomes the landing page when someone types the website’s domain name in a browser. Further, this is set as a static page (like this website) or as a blog post page on a blog depending on the user’s choice (Fig. 5).
The OceansWP General Options Menu
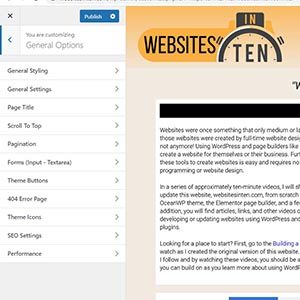
Figure 6 show the General Options menu. It is one of the most used customization menus for many. However, just like the main menu, some items are unimportant or unused by some users. Look at the items on the menu and let’s see what is important.
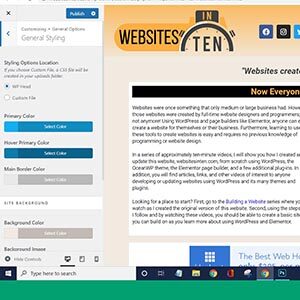
The General Stylings menu selects the primary and hover font colors for the header (if used). In addition, the header border color is selected here. Secondly, it selects the default color for the page background. Finally it sets the default color for links and hovering over links on a page (Fig. 7).
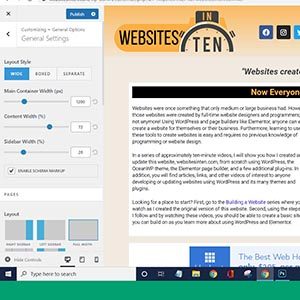
The General Settings menu sets the layout (content and side bars) as well as style and size of content blocks. However, if a page builders is used, this will probably be set to full width and controlled by the page builder plugin (Fig. 8).
Other Sub-menus of the General Options Menu
The General Options Menu controls several other features. First, the Page Title menu controls the visibility, look, and placement of the page title. In addition, this menu controls the look and placement of the title breadcrumbs. Secondly, the Scroll to Top and Pagination menus customize the way scrolling and pagination occurs for blog posts. Thirdly, the Forms menu is used to control the look of input and text areas on forms used on the site. Finally, Theme Buttons and Theme Icons control the default look of buttons and icons on the site’s pages.
The Ocean WP Typography Customization Menu
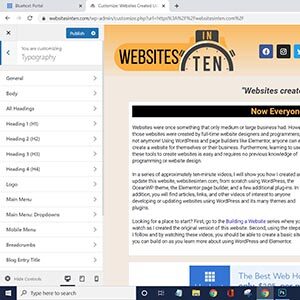
The main customization menu contains The Ocean WP Typography customization sub-menu. It controls the default font, color, size, style, and spacing on the site. As a result, each sub-menu sets the default setting for different things on the site.
First, the general menu sets the general sub-set for all fonts. Further, this menu generally needs no changes. Secondly, the body menu sets the default font characteristics for the main text body. Next, several sub-menus follow. They set characteristics for all headings. In addition, several sub-menus control settings for individual headings and even a logo if used.
The next set of sub-menus control the look of menus, drop-downs, mobile menus, and breadcrumbs, followed by the look of blogs and sidebars. Finally, a couple of menus pertain to the look of items in the footer of each page.
Many page designers use the sub-menus under Typography extensively, especially when using WordPress without a page builder plugin. As a result, when customizing any part of theme involving fonts and colors, the Typography sub-menus are a good place to look.
Some Other Menus
Most of the other menu items are self-explanatory. First, the Top Bar menu deals with the bar above the header; whether it appears and what it looks like. In addition, The Header menu sets the look, images, menus, social icons, and even a logo if desired of the header at the top of each page.
The Blog menu, as it implies, sets the look of the blog entries page as well as the single blog posts. First, these settings control the layout of pages. Secondly, settings here control the blog heading appearance. Thirdly, the user chooses the inclusion and positioning of blog elements such as title, author, date, category, etc. from this sub-menu. Finally, The Blog menu controls pagination and how paging will look through its submenus items.
The Sidebar menu manages Sidebar background color and padding. Additionally, it also sets the look of widgets that are included in the sidebar. This menu is often not used if a page builder plugin is used.
The Footer Menus
The two menu items, Footer Widgets and Footer Bottom control the look and placement of items in the footer at the bottom of each page. For example, enabling footer widgets in the Footer Widgets menu allows the user to choose the number of widget columns in the footer and to automatically add space to keep the footer at the bottom of the screen. Additionally, it sets the colors and look of the footer widget area. First, the Footer Bottom menu allows the enabling and visibility of the bottom of the footer. Secondly, it allows copyright inclusion. Finally it sets the colors and look of the bottom of the footer.
The last menu, Custom CSS/JS, is not used by most WordPress creators. Knowledgeable users can insert custom CSS and Java Script into a page using this selection. Inexperienced users should take care when using this menu selection.
Start a WordPress Website. It's Easy and Straightforward.
To be able to install and customize a theme and have maximum control of the look of your website, you need a self-hosted WordPress website. This allows you to use all the features of WordPress along with its themes and plugins. However, this is an easy process, even if you have no experience creating a website. First, get a domain name that represents your website. Registrars sell domain names to end users like you and me. In addition, many of these registrars are also companies who provide web hosting as a sort of one-stop shopping for setting up a website. Secondly, get a host. A host provides space for storing the website content and provides the connection to the Internet. Finally, get a host that has WordPress installed and ready for installation on your website.
I support this website by affiliation with hosting companies. For example, one such company, Bluehost, pays me a commission (at no cost to you) if you click a link on this page and sign up for a domain and hosting by . Bluehost hosts this website. Further, it also acts as the domain registrar for websitesinten.com and other domain names that I own. In addition, at the time of this writing, if you sign up for hosting with Bluehost, you get a domain name free for the first year. This is the one I use. There are hundreds of these registrar/hosts available on the Internet that provide comparable services.
Regardless of who you use for hosting, much of the process is the same. To see how I originally built this website, check out the videos in the Building a Website Series.
